Garden Journal

Spring Greens

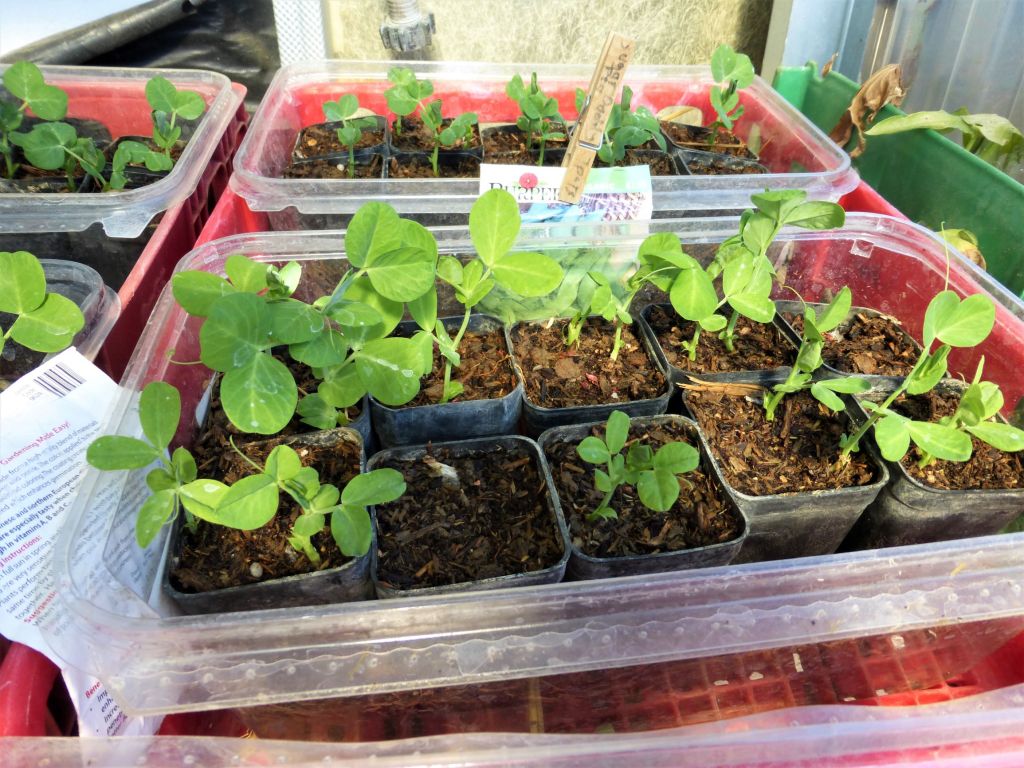
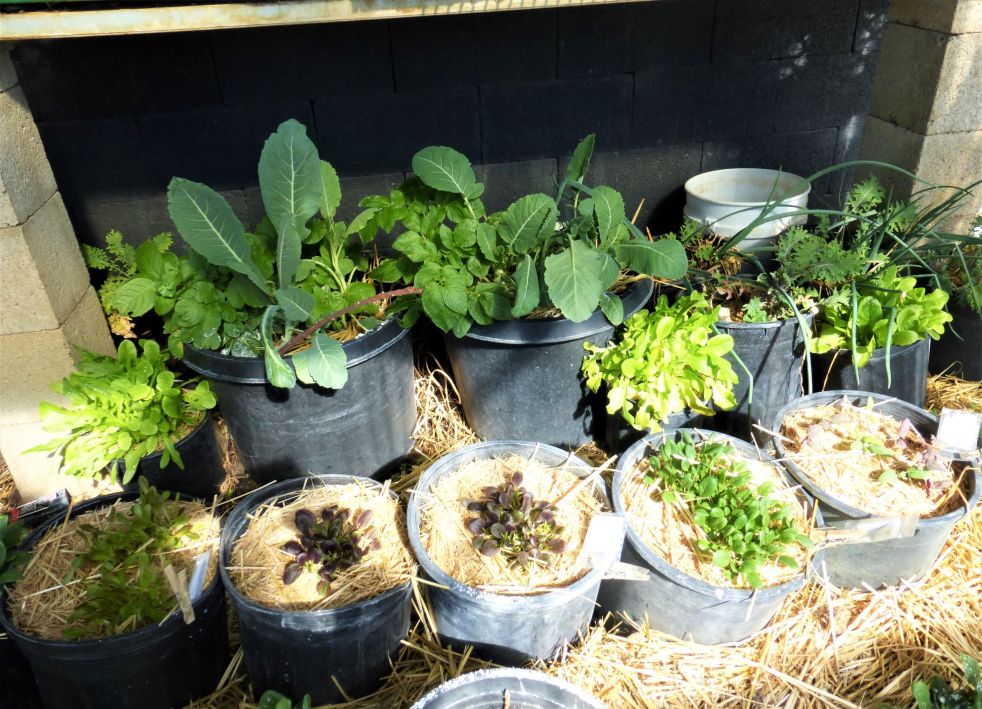
As you can see, I’ve got LOTS of lettuce and greens growing right now! I’ve got a wide variety of lettuce, spinach, rapini, Bok Choy, Swiss chard, kale, and other greens, as well as peas.

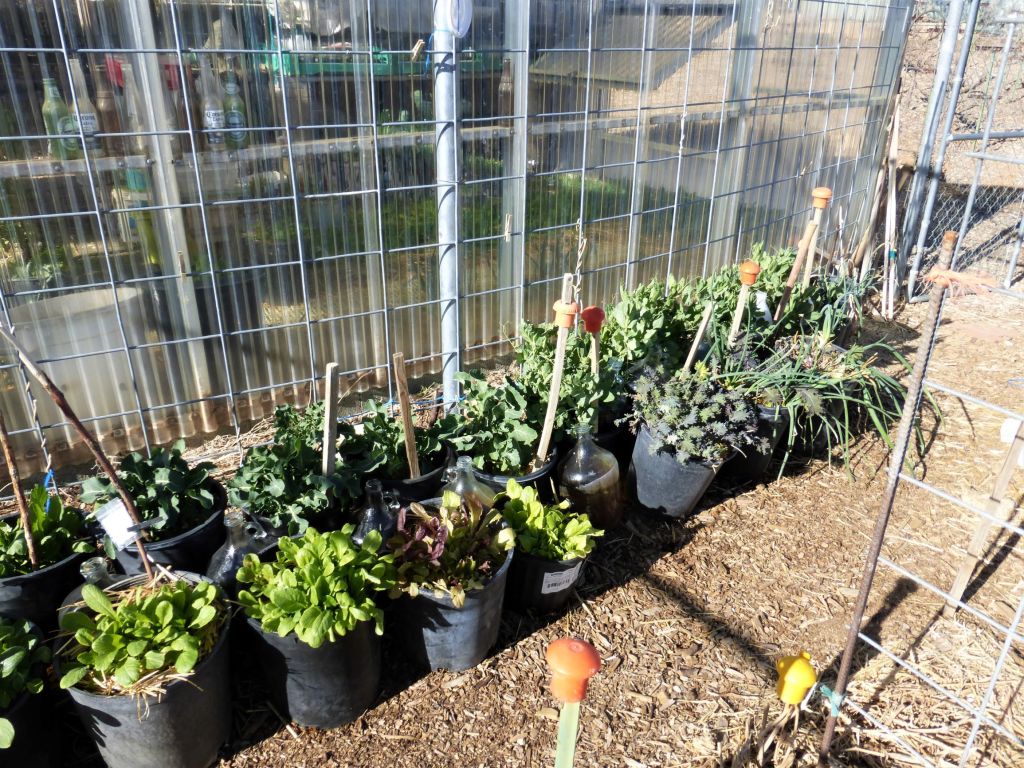
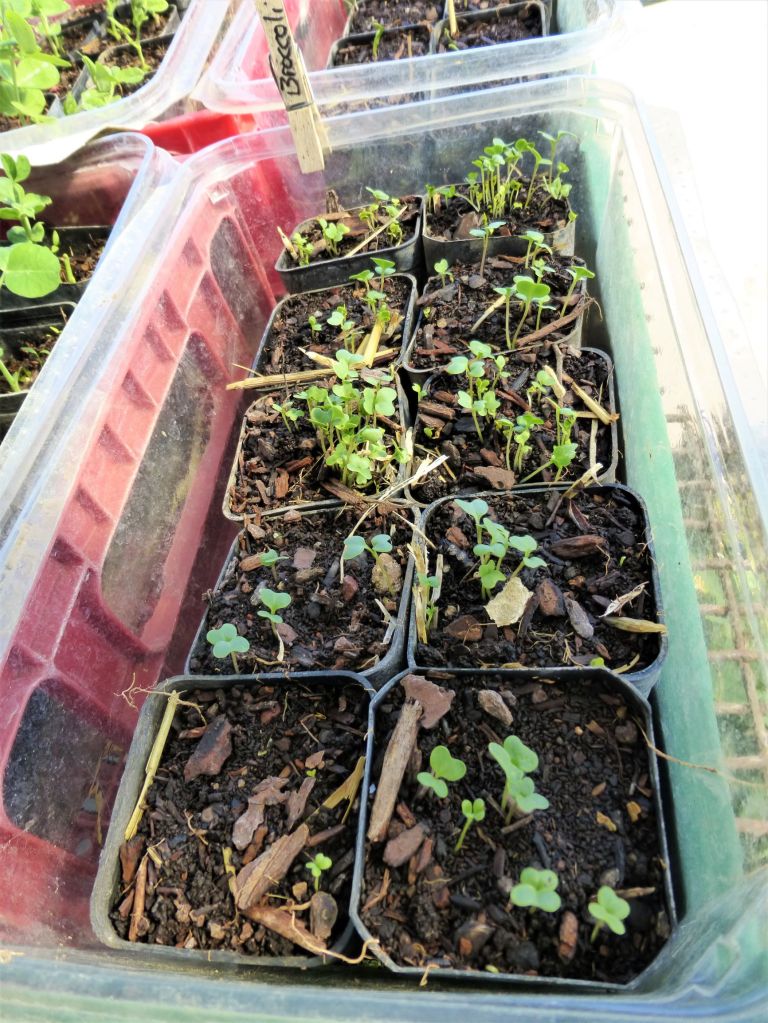
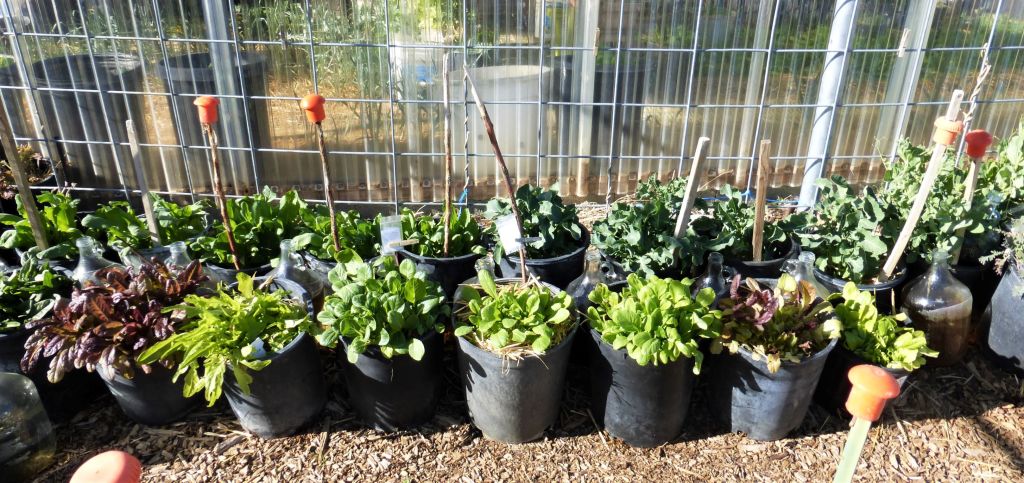
I’ve also got quite a few onions and broccoli plants that overwintered quite nicely. The broccoli and peas were direct seeded in bottomless pots sunk a few inches in the ground and filled with a rich soil and compost mix. During the winter I surrounded them with glass jugs of water to help keep them warm. The water would warm up in the sun (as did the black pots) and then the added heat would be released at night keeping the surrounding temperature above freezing. If the temps dropped too low (30 degrees or so) I’d also cover the plants with a sheet. We got temperatures down to 23 degrees and none of the plants sustained any damage.

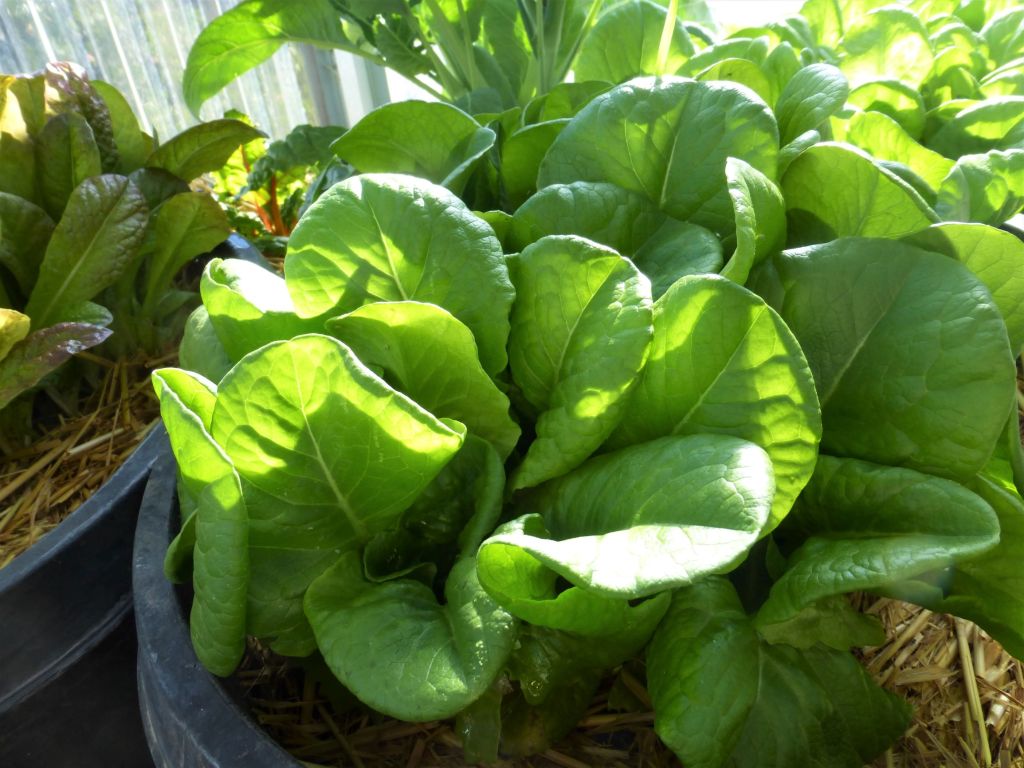
I also planted pots with lettuce and greens in the greenhouse. Above is my beautiful Buttercrunch lettuce.

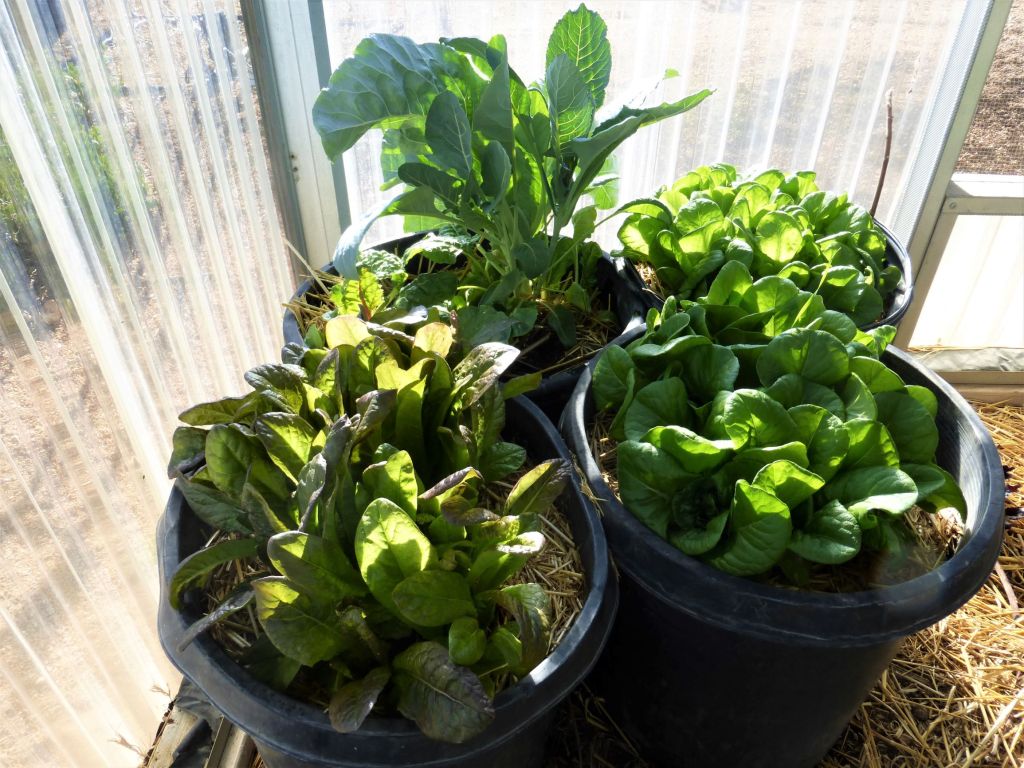
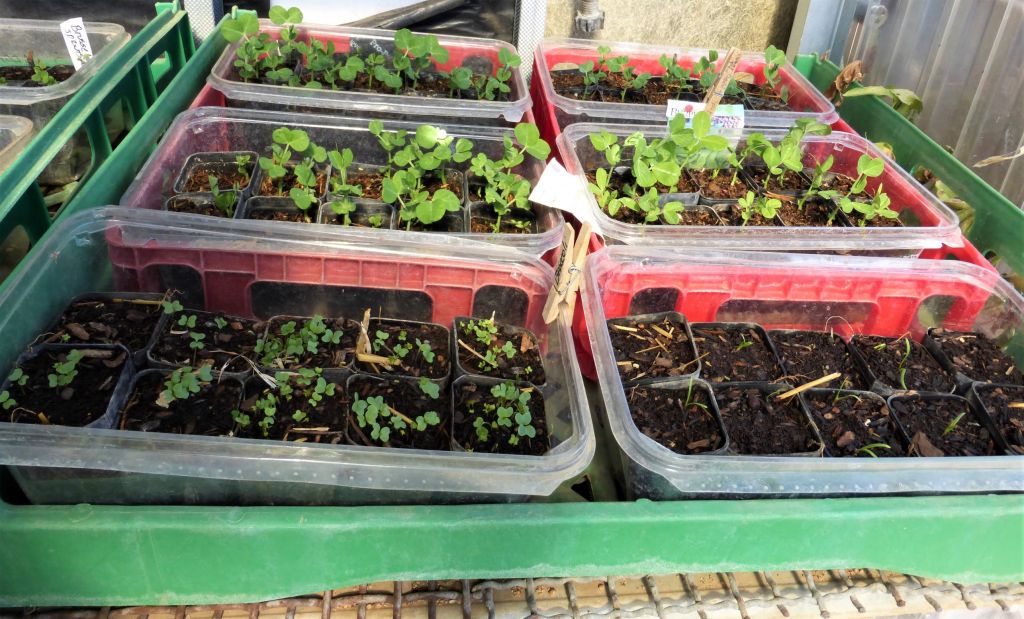
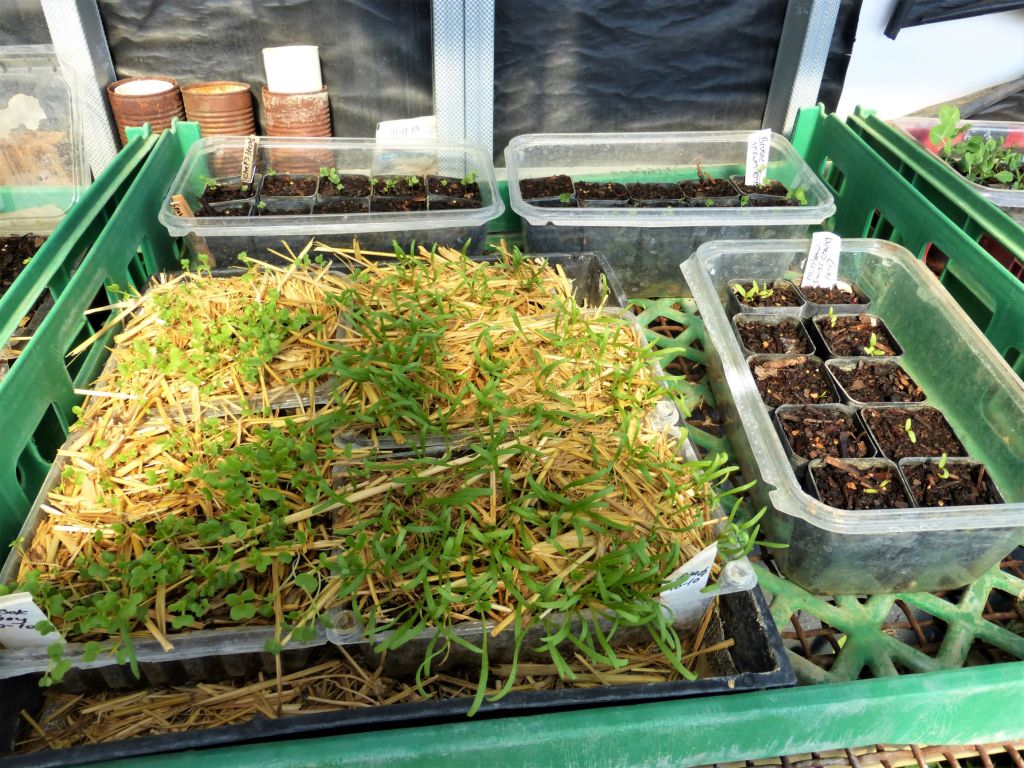
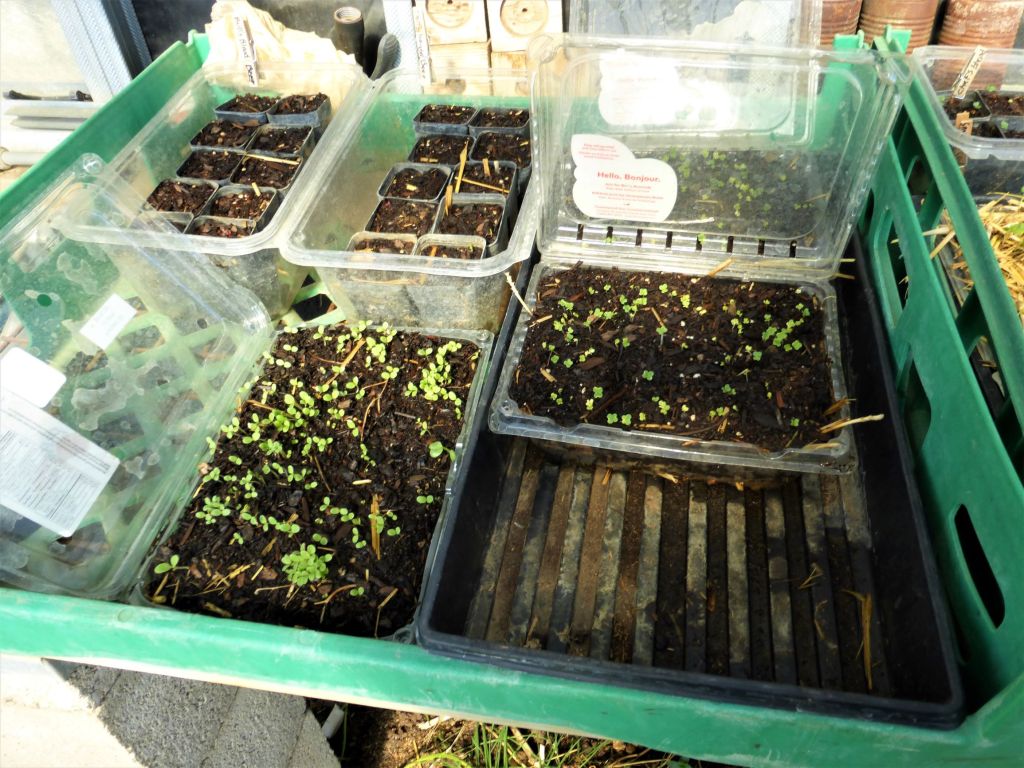
I planted some cauliflower seedlings in large pots in the greenhouse as well. Above is a potted cauliflower, some Buttercrunch and some Trout Speckled Romaine lettuce. I started the lettuce and most of the greens in shallow plastic berry containers. When the plants were about a month old and had some nice roots I was able to easily transplant them to larger pots without disturbing the roots and causing transplant shock. Sowing the seeds in potting mix in those berry containers works so well I’m doing it with all my greens now. It seems like whenever I direct sow I lose a lot (if not all) of my seedlings to insects- particularly potato bugs. Waiting until the plants are a month or two old before I plant them in the ground seems to give them a fighting chance against the bugs.

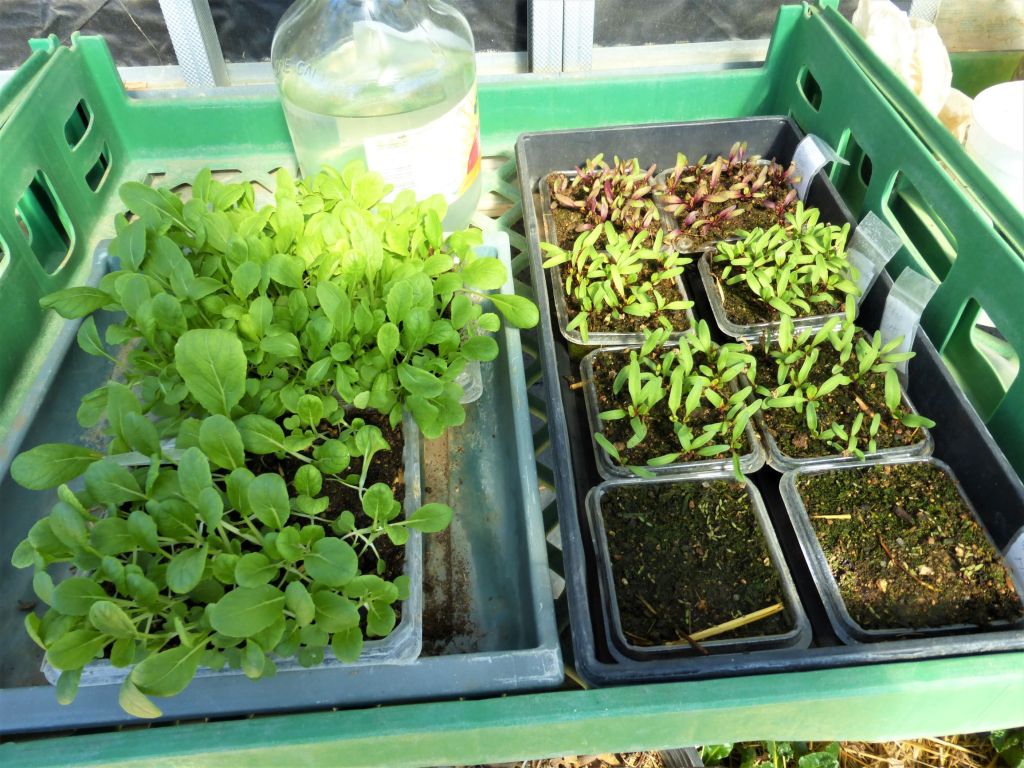
This year I bought a bunch of unique seeds from Baker Creek Heirloom seeds. They’ve got lots of different greens that I’ve never heard of before. Above is Aurora Mixed Orach, a bolt resistant spinach substitute. I love spinach, but I can only grow it in the winter- the minute it starts to get warm the plants want to bolt and start producing seeds. I was able to find several different spinach substitutes that can handle the heat, so hopefully I’ll have a much longer season for harvest.

Above is another new find- Chijimisai greens, which are a cross between tatsoi and komatsuna. They have four times as much vitamin A as carrots and are heat and cold tolerant. I love greens like this- highly nutritious with a long harvest season. You can get so much out of plants like these!

I started all my greens and lettuce, and a few plantings of beets in berry containers and then transplanted them into 3 gallon pots. I kept the pots in the greenhouse until the nighttime temperatures were above freezing, and then hardened the plants off for several days before leaving them out in the garden. Since they’re in pots I can move them into the shade when it starts to get warmer.

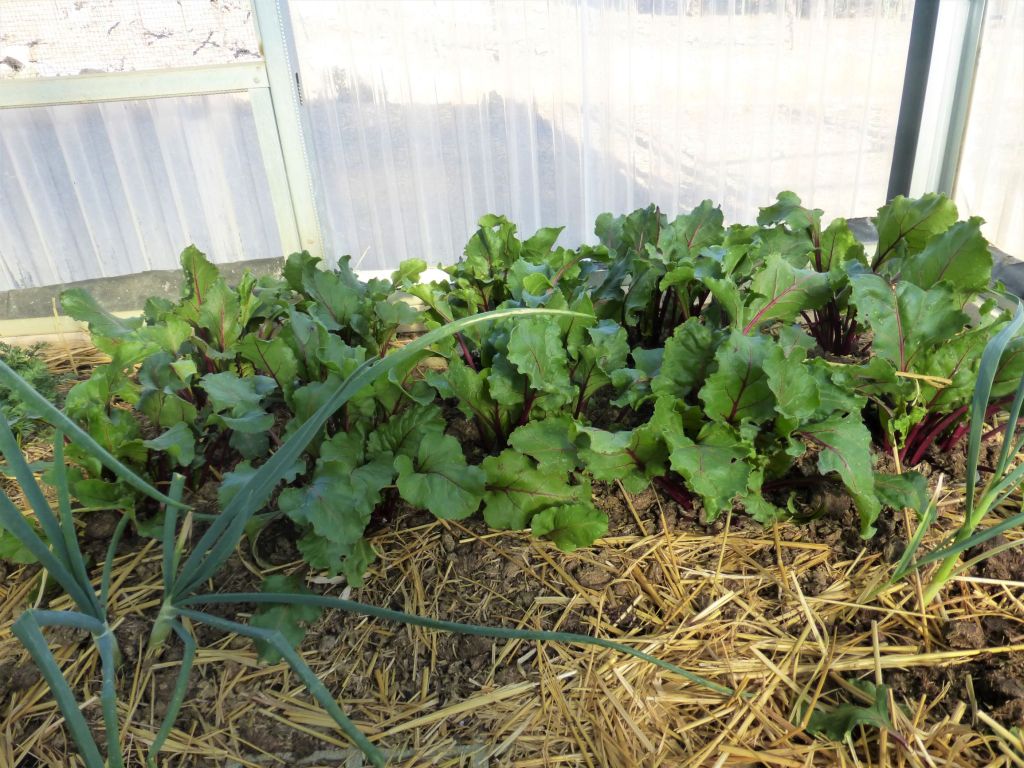
In October I started some beets (Tall Top Early Wonder) in several berry containers and transplanted them into the greenhouse when they were about a month old. I’ve been harvesting the greens for several weeks now and recently thinned them and had some nice baby beets. I replanted some of the roots from the first thinning and most of them have survived and are growing nicely. Beets are another favorite of mine. You can get so much from one plant! You can harvest the baby greens and include them in your salad- they are so sweet and tender! As the leaves get larger you can harvest them and sauté them (stems included) as you would any other green. Then of course you’ve got the beet itself- delicious roasted whole or diced and sautéed.

Above is the lettuce I started in berry containers in October. In November I transplanted it into the ground in the greenhouse and have been harvesting ever since. It’s starting to get warm now (70 degrees or so) and these plants will probably start to bolt soon since they’re in the greenhouse and the temps get to 85 or 90 degrees during the day. I may save a few plants for seed, but the rest will go to the chickens. Now my lettuce in the gardens is really looking nice, so I still have plenty for salads. Plus I just noticed some stray lettuce popping up in a few of the gardens 🙂

I feel so lucky to have been able to continue planting and growing greens and veggies all winter. There’s nothing as grounding and calming for me as being among my plants 🙂 I just love growing things and tending them throughout the growing season. And there’s nothing as delicious or nutritious as food you grow yourself!

Thanks for stopping by!

~Michelle

Shop CreativeCritters on ArtFire

Shop CreativeCrittersClay on Etsy

Find Michelle of CreativeCritters on Facebook

Gallery

Hand Stitched LOVE Purse

I’ve needed a new purse for quite some time now (the old one was literally falling apart) and had decided to make one myself since I couldn’t find anything I really liked in the store. I looked online for patterns, but once again I didn’t find anything that was “just right”. So what did this creative gal do? Well I designed my own purse from scratch of course!

Calcifer hard at work supervising my progress

First I had to decide what materials to use for the body and lining. I intend for this purse to last a long time, so I wanted something durable. I remembered some teal blue car upholstery fabric I’d been given a few years ago and when I unearthed that swatch of fabric I also found a bit of navy blue fabric as well. I love this stuff! It’s tough, but really soft and not too difficult to hand stitch (not nearly as hard as stitching leather).

I love everything about this purse, from the cat zipper pull to the LOVE on the pocket 🙂

I also repurposed a small round purse (too small to be of practical use) with a the word LOVE in green leather on blue suede. I carefully cut the applique out and ended up using the zipper as well. It turned out to be just the right length. I really didn’t want to have to go to the store or buy anything to make this if I didn’t have to. And it seemed like just the right things came to me as I need them.

Of course I had to have a kitty cat zipper pull!

This cute cat charm is one example of finding just the right piece, just when I needed it. I was going through my stash of beads and things looking for something to use as a zipper pull. I had a handful of “maybes”, and then I found this cat charm, which I’ve had for many years, and I knew I’d finally found the perfect use for it. I mean, it even has a blue belly!

Pink lining and two interior pockets

I used a pretty pink fabric for the lining. I’ve learned that it’s so much easier to find things if a purse has a light colored lining. Even a small purse can turn into a black hole when it’s got a dark lining- things just disappear into the deep dark depths! I added two interior pockets with Velcro closures. This purse is roomy enough to hold everything I need without being too big and bulky. I’m just not into purses that could double as luggage 😉 It measures about 8″ long and 6″ tall.

The gusseted bottom adds a bit more space inside

I used the teal blue fabric for the sides and outer pocket and the navy blue for the bottom and the strap. Hand stitching the thick leather LOVE logo to the front pocket (which also has a Velcro closure) was a slow and somewhat painful process, but I was determined! I also reused the hardware from my old purse to attach the strap to this one. And that strap took a LONG time to stitch by hand!

It even goes with the dress!

And I had a deadline for completion of this little project. I had an event to attend and I really wanted to have the purse done in time. I hadn’t planned the outfit and the purse ahead of time, but it totally worked out 😉 I managed to get the purse done ONE day before my deadline, and even though my poor fingers were still hurting days later I was really happy with the way it came out. It’s actually pretty rare for me to make something for myself (I’m usually too busy making gifts or things to sell online). But when I do make something for myself I make sure it’s exactly what I want and perfectly suited to my needs: not too big, not too small, the right amount of pockets in the right size, the right color and decorations- something that makes me smile when I use it 🙂 I took my time creating the pattern for this, trying and rejecting several paper patterns before refining the size and shape to perfection. It was challenging but fun. Figuring out how to make the lining and install the zipper took some time, but I think it came out pretty good. And the zipper works even better than the one on my old store bought purse. I really am pleased with this one, and it’s something I’ll get a lot of use out of.

Thanks for sharing another of my creative adventures!

~Michelle

Shop CreativeCritters on ArtFire

Shop CreativeCrittersClay on Etsy

Find Michelle of CreativeCritters on Facebook

Gallery

Cute Creations- Tiny Plush Toy Dinosaurs

I’ve been busy in the craft room again 😉 I just finished this set of four tiny plush dinosaur toys (a gift for a little boy turning 3).

Set of 4 hand sewn plush dinosaurs

These cute critters were all sewn by hand using patterns that I created or adapted. I used a variety of colorful fabrics and felt.

Tyrannosaurus Rex in camouflage fleece

This not so terrible Tyrannosaurus Rex was made using camouflage fleece fabric with hand painted eyes and mouth. He ended up looking pretty happy and friendly for a T-Rex 😉

This cute and colorful Stegosaurus was made from purple and red felt 🙂

I used a green and blue plaid fabric for the body and legs of this happy little Brontosaurus and bright yellow felt for his belly.

I made this brightly colored Pterodactyl with a red felt body and blue and green felt wings. His eyes. mouth, and markings were hand painted.

Calcifer being attacked by dinosaurs 😀

Of course Calcifer helped with this project, as he does with all my creations. He even thwarted a dinosaur attack! LOL

These little dinosaurs were a big hit, and they were as much fun to make as they are to play with 🙂

Thanks for stopping by!

~Michelle

Shop CreativeCritters on ArtFire

Shop CreativeCrittersClay on Etsy

Find Michelle of CreativeCritters on Facebook

Gallery

Purple, Red, and Yellow Knit Dragon

This handmade colorful knit dragon was a birthday gift for a 3 year old boy.

This cute and cuddly fantasy dragon was knit by hand using my own original pattern, making him a unique, one of a kind creation. I used purple acrylic yarn for his body, arms, legs, and tail. His belly and the underside of his tail, along with the area around his eyes, was knit using bright yellow acrylic yarn.

The triangular spines running down his back and tail were knit from bright red acrylic yarn. I made his wings by sewing together purple and red felt and sewing veins to help them hold their shape without the use of any wires.

I used yellow plastic safety eyes with locking washers to make this toy child safe. The dragon is stuffed with polyester fiberfill and is very soft and huggable.

This fantasy creature measures about 15 inches long (from his toes to the tip of his tail) and 15 inches tall to the top of his red forehead spine.

I love fantasy and all the creatures that can be found in that magical world, especially dragons. I wanted to challenge myself to create a knit dragon in bright colors that children would like. I made the pattern up as I went along and actually surprised myself with the final creature!

Thanks for stopping by!

~Michelle

Shop CreativeCritters on ArtFire

Shop CreativeCrittersClay on Etsy

Find Michelle of CreativeCritters on Facebook

Gallery

Christmas Gifts 2020- Cat and Dog Scarves and Hats

Calcifer modelling the pink cart scarf 😉

Now these were fun to make! As with most of my projects I enjoyed playing with color and for each of these scarves and hats I combined several colors of yarn for an interesting effect.

Pink cat scarf and cat hat

For this scarf and hat I used three shades of pink yarn. I knit the scarf body first, then knit the legs and tail separately and sewed them on. The head was also knit separately and has plastic safety eyes. I came up with my own pattern for each of these scarves and hats after getting some inspiration online.

Purple and white cat scarf and cat hat

This scarf was knit in purple and white and the hat was knit using three shades of purple.

Calcifer modelling the blue dog scarf 😉

This dog scarf and hat was knit in shades of blue and white. Of course Calcifer helped me knit all of these and they each have his purr of approval 😉

Blue dog scarf and dog hat

Sort of unintentionally, every one of these scarves turned out a bit different. I wrote down my patterns as I created them, but using different yarn changed up the results for each. That’s OK though, most of my work is one of a kind, whether it’s a gift or something for sale.

Light blue dog scarf and dog hat

And for the final dog scarf I used light blue, light blue green, and white yarn. And this guy ended up with a big blue nose. (Sort of makes me think of Blue’s Clues). Since these were all made for young kids I wanted them to be fun and whimsical, as well as soft and warm.

So that’s it for the Christmas gifts for 2020. Some of the things I made for gifts may be recreated and listed in my Etsy and ArtFire shops (those ornaments were a lot of fun to create- I can definitely see myself making more of those). If you’re interested in any of my work be sure to check out my shops and see all I have to offer. And if you’d like to purchase something similar to what you’ve seen in my Christmas Gifts posts or other posts in my Gallery category, just send me a message and I’ll see what I can do for you.

Thanks for stopping by!

~Michelle

Shop CreativeCritters on ArtFire

Shop CreativeCrittersClay on Etsy

Find Michelle of CreativeCritters on Facebook

Gallery

Christmas Gifts 2020- Blue Ornaments

Today I’m sharing the set of blue Christmas ornaments I made. As with the red and green ornaments, I made these by adding polymer clay to a glass spice jar.

blue polymer clay covered glass Christmas ornament

For this ornament I strung together several pretty blue glass beads and hung them inside the jar. These ornaments are just beautiful hanging in a window, or with a Christmas light behind them.

bottom of ornament

For the bottom of the ornament I used my large Maple leaf cookie cutter and cut out several leaves which I stamped and colored with metallic blue Pearl Ex powder. I overlapped the leaves on the bottom of the jar and then layered star shapes over that.

top of ornament

I layered textured star shapes over the top of the ornament as well. On this one I added a string of metallic seed beads and a string of blue seed pods. Half the fun of making these ornaments is sifting through my bead and broken jewelry stash to find just the right beads. These seed pods came from a really cool necklace and they’ve found their way into several of my creations 😉

blue ornament

I used Tacky glue to help adhere the textured stars on the corners of the jar. Tacky glue works really well with baked and unbaked polymer clay.

Christmas ornament with blue flowers

For this ornament I made good use of some of my flower cutters. I love using cookie cutters and cake decorating cutters with polymer clay 🙂

top of ornament

For the top of this one I layered flowers in decreasing size. First I brushed the flattened sheet of clay with blue Pearl Ex powder, then I used an intricate Victorian filigree stamp to impress a pretty design, then I cut out the flower petal shapes. Brushing the clay with Pearl Ex powder before stamping it helps to keep the clay from sticking to the stamp.

side of ornament

I added flowers around the top and down the sides as well. Once again I used Tacky glue to help adhere the unbaked clay to the glass.

bottom of ornament

I stacked more daisy flower petal shapes on the bottom of the ornament. I love the way the Pearl Ex powder helps the stamped design to stand out.

So that’s it for the ornaments for now, although I’m sure I’ll be making more of these. Projects like these ornaments allow me to explore my creativity and experiment with different techniques. 🙂

Thanks for stopping by!

~Michelle

Shop CreativeCritters on ArtFire

Shop CreativeCrittersClay on Etsy

Find Michelle of CreativeCritters on Facebook

Gallery

Christmas Gifts 2020- Green Ornaments

I just wanted to share more of the Christmas ornaments I made this year. I made a set of green ornaments using glass spice jars for the base. I just KNEW I’d find a use for all those spice jars I’ve been saving!

Green polymer clay covered glass Christmas ornament

For this one I painted the bottom of the spice jar from the inside to cover up the stamped lettering on the bottom of the jar. I used a pretty sparkling teal acrylic paint, which I think goes nicely with the green polymer clay.

Top view of the ornament

Using my leaf shape cutters from my cake decorating set I cut out leaf shapes, rubbed them with green Pearl Ex powder, then stamped them for an interesting texture. Then I layered them over the top of the jar. For the top layer of leaves I used more of a teal blue green Pearl Ex powder. This matches the paint on the inside of the jar nicely (plus I love that color 🙂 )

glass beads hanging inside the ornament

I picked out several green glass beads and hung them inside the ornament. These ornaments look especially pretty hanging in front of a window with the sunlight shining through.

bottom of the ornament

On the bottom of the ornament I layered squares of green polymer clay which was also rubbed with Pearl Ex powder and stamped.

clay covered ornament with Christmas tree and gingerbread man cutouts

The second green ornament was made by first painting the glass spice jar with green sparkle paint then completely covering the jar with clay. I rubbed the clay with green Pearl Ex, then cut out Christmas tree and gingerbread man shapes.

top of the ornament

I cut out large leaf shapes, dusted them with Pearl Ex, then stamped them with pretty floral designs before layering them over the top of the ornament.

detail view of ornament

I added stamped leaf shapes, stars, and the cut out Christmas trees along the bottom and sides of the ornament.

bottom of the ornament

Before painting the glass, the very first step was to add a cardboard armature to make the bottom come to a point. Then I was able to cover the bottom with more stamped leaf shapes.

Calcifer Kitty inspects the final product

Of course I had my fluffy supervisor to oversee the whole project 😉 Calcifer has to inspect everything I make- it’s his job after all!

Thanks for stopping by to check out my handmade Christmas ornaments!

~Michelle

Shop CreativeCritters on ArtFire

Shop CreativeCrittersClay on Etsy

Find Michelle of CreativeCritters on Facebook

Gallery

Christmas Gifts 2020- Red Ornaments

I just thought I’d share some of the Christmas presents I made this year. I’ve been pretty busy for the last few months, creating ornaments, scarves and hats, toys, slippers, and many batches of cookies.

These turned out to be beautiful and unique Christmas ornaments

Today I wanted to share a pair of red ornaments I made using recycled glass spice jars, polymer clay, and glass beads. I’ve collected so many of these glass spice jars, knowing that I’d be able to make something really cool with them eventually.

Top view of the ornament

For some of these ornaments I covered the top, bottom, and outer edges with clay and left the center area clear. I attached a string of glass beads to hang inside the ornament. These look really pretty hanging in a window with the sun shining through.

The clay flowers that adorn the edges were stamped and then rubbed with Pearl Ex powder for added depth and shimmer

I had a lot of fun playing with my shape cutters, stamps, and Pearl Ex powders. I just love the effect you get from stamping the unbaked clay and then rubbing Pearl Ex over the raised surface. It really helps to bring out the design.

Bottom of the ornament

I liked playing around with layering the shapes. I got a set of shape cutters made for cake decorating and they work great with polymer clay. I spent hours just totally lost in my little creative world 😉

This ornament is more fully covered in clay with just the star shapes cut out

Above is a different type of ornament. Here I wanted to experiment with cutting shapes out of the clay. For this one I used red sparkle paint to cover the jar so that would show through the cut outs.

I used gold Pearl Ex to compliment the red clay

Once the paint was dry I covered the jar with a sheet of red clay and used a star cutter to cut out stars around the ornament.

top view of the ornament

I made good use of my stamps and Pearl Ex powders with this one too. Rubbing the flattened sheet of clay with Pearl Ex and then pressing in the stamped design works really well. The powder keeps the stamp from sticking to the clay and you can get a nice deep impression.

stars, stars, and more stars 🙂

Part of the fun of making these ornaments (and I made quite a few all together) was sifting through all my stamps and deciding which to use. Polymer clay plays well with so many different mediums: paint, stamps, powders, beads, inks, and all sorts of other embellishments!

Bottom view

Before I covered this in clay I added a cardboard armature to the bottom so it came to a point like this.

I really enjoyed creating these ornaments and took my time with the whole process, just letting my muse guide me. There was absolutely no “plan” for any of these (I’ll be sharing more ornaments later), just a vague idea. These turned out even better than I expected and I plan to make more, eventually listing some in my Etsy and ArtFire shops. This year I just wanted to be sure I had enough to give as gifts.

I’ll be sharing more of my Christmas creations in future posts, so stay tuned!

Thanks for stopping by, and I hope your holidays have been full of laughter and love.

~Michelle

Shop CreativeCritters on ArtFire

Shop CreativeCrittersClay on Etsy

Find Michelle of CreativeCritters on Facebook

Garden Journal

The Fall Garden

Although the recent freeze has ended the growing season for warm weather crops I’m preparing for the Fall and Winter growing season. Here in zone 8a I’m able to grow a variety of plants right through winter, so my gardening season doesn’t end with the first freeze.

A few weeks ago I started seeds for most of the veggies I want to grow this Fall and Winter. I would normally direct seed many of these, but the potato bugs have been devouring any seeds I’ve planted lately. I figured if I got them started in containers in the greenhouse and let the plants get a bit bigger (and the weather a bit cooler) they’d stand a better chance of survival.

broccoli, spinach, and peas

This is the second (or is it third?) planting I’ve made of broccoli. Those darn potato bugs and grasshoppers didn’t give the first plantings (direct seeded in the garden) a chance! This is a second batch of spinach I started as well. I love spinach, so I’ll probably start another batch or two with in the next few weeks. The peas are doing well and I hope to be able to plant them out in the garden in another week or two.

spinach, bok choy, beets, cauliflower, and brussel sprouts

Above is my first planting of spinach along with some bok choy, which I started in berry containers. There are 4 different berry containers there, and when it comes time to transplant into the garden the whole tray of soil comes out easily without disturbing the plant’s roots. If I want to I can gently separate chunks of plants and spread them out in the garden. I also have beets, cauliflower, and brussel sprouts started in 2″ pots. So far they’re all doing well.

lettuce, beets, and tatsoi

Here you can see the berry containers better. In these I’ve got lettuce and tatsoi. I line the bottom of the containers with straw before adding the soil and it helps to keep the soil from washing out when I water. In the back I’ve got more 2″ pots with beets. I love beets too, and lately I haven’t had much luck planting the seed in the ground. Hopefully I’ll end up with a good harvest from this crop. I like to eat the beet greens too. When they’re small they’re great in a salad, and when they get bigger I like to saute them with olive oil, garlic, and onion (and beets and carrots when they’re available).

I also started seeds for Red Russian kale, rapini, New Zealand spinach, and swiss chard. I planted quite a bit of garlic in the greenhouse a few weeks ago, along with some carrots. Some of the lettuce and greens I’ve got in pots will be transplanted into the greenhouse. Lettuce and greens have always done well in the greenhouse all winter long.

butternut squash

I harvested all the butternut squash before the freeze and came away with quite a few really nice squashes. This is only about half the harvest here. These are great because they’ll store for months in the root cellar.

This Fall I’ll be filling up the garden with more plants than ever. Since I’m doing permanent, no till beds now the chickens won’t be allowed in the garden over winter and I won’t have to fence anything off. I’ll have the whole garden to play with 😉 Don’t worry about the chickens either- they’ll be getting a new run in the spring and I’ve got a few ideas for giving them access to fresh greens. And of course they get all the kitchen scraps, so they’re not missing out too much.

I do love living someplace where I can garden year round! I’ve picked some of my best salad and greens in the middle of winter. And let me tell you, nothing is more enjoyable than hanging out in the greenhouse on a cold winter day 🙂 I make sure to mulch heavily and put row covers over the outdoor plants if temps dip below freezing, but I’ve had broccoli, brussel sprouts, cauliflower, spinach, carrots, greens, lettuce, and peas survive temps as low as 25 degrees out in the garden, under row covers. Plants are just amazing!

Happy gardening!

~Michelle

Shop CreativeCritters on ArtFire

Shop CreativeCrittersClay on Etsy

Find Michelle of CreativeCritters on Facebook

Gallery

Fall Favorites from CreativeCritters

Just thought I’d share a few of my favorite Fall creations available at CreativeCritters on ArtFire and CreativeCrittersClay on Etsy.

Polymer Clay Oak Tree With Face and Glow in the Dark Moon Wall image 0
Polymer Clay Oak Tree With Face and Glow in the Dark Moon Wall Hanging

This handmade decorative Oak Tree wall hanging is a one of a kind piece, sculpted by hand in polymer clay without the use of molds. It measures about 9 1/2 inches tall from the base of the tree to the top of the wire.

OOAK Fall Maple Leaf Fairy Polymer Clay Sculpture Autumn Wall Hanging

This one of a kind Autumn wall hanging was sculpted by hand in polymer clay and is a delightful way to decorate your home for Fall. The large polymer clay Maple leaf was cut and shaped by hand, as was the Fall fairy, which appears to be part of the leaf itself. The leaf measures 9 inches tall and 11 inches wide, with the fairy measuring about 6 1/2 inches tall. 

Spooky Polymer Clay Glow in the Dark Haunted House sculpture image 0
Spooky Polymer Clay Glow in the Dark Haunted House sculpture Halloween Decoration

This one of a kind spooky miniature Halloween haunted house was sculpted by hand in polymer clay. Every tiny little detail- each leaf, shingle, cat, and ghost- was painstakingly sculpted by hand. The base of the sculpture, which I’ve signed and dated, is covered in felt and measures eight inches long and five inches wide. The sculpture measures about eight inches tall to the highest point. If you’re looking for a unique Halloween decoration, this spooky fun glow in the dark haunted house is something you’ll want to display all year long!

Scarecrow in the Pumpkin Patch sculpture

This scarecrow doesn’t seem to be doing a very good job of scaring crows away from the pumpkin patch! He enjoys their company though- just look at the big grin on his face! This piece was sculpted by hand in polymer clay and measures 6″ tall and 6″ wide. 

OOAK Glow in the Dark Halloween Witch and Black Cat with image 0
OOAK Glow in the Dark Halloween Witch and Black Cat with Cauldron Candle Holder

This one of a kind Halloween sculpture also doubles as a candle holder. The spooky witch and her black cat familiar were sculpted by hand from polymer clay. This piece measures 10 inches tall, 8 inches wide, and is a truly unique work of art. 

Squirrel Gathering Acorns Amongst Oak Leaves Handmade Candle Holder

This fun fall candle holder was sculpted by hand in polymer clay and depicts a cute squirrel gathering acorns amongst fallen Oak leaves. The entire piece measures 6 inches at the widest point and 3 inches tall. This would make a whimsical and fun Autumn decoration.

To view the full listing for each item simply click on the picture.

Thanks for stopping by!

~Michelle

Shop CreativeCritters on ArtFire

Shop CreativeCrittersClay on Etsy

Find Michelle of CreativeCritters on Facebook